Nissan Versa (N17): Engine oil
Checking engine oil level
1. Park the vehicle on a level surface and apply the parking brake.
2. Start the engine and let it idle until it reaches operating temperature.
3. Turn off the engine. Wait more than 10 minutes for the oil to drain back into the oil pan.
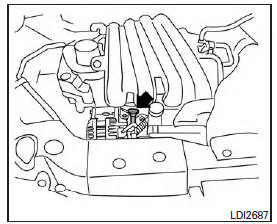
4. Remove the dipstick and wipe it clean. Reinsert it all the way.

5. Remove the dipstick again and check the oil level. It should be between the H (High) and L (Low) marks B . This is the normal operating oil level range. If the oil level is below the L (Low) mark A , remove the oil filler cap and pour recommended oil through the opening. Do not overfill C .
6. Recheck oil level with the dipstick.
It is normal to add some engine oil between oil maintenance intervals depending on the severity of operating conditions or depending on the property of the engine oil used. More engine oil is consumed by frequent acceleration/deceleration especially when the engine rpm is high. Consumption is likely to be higher when the engine is new. If the rate of oil consumption, after driving for 3,000 miles (5,000 km), is more than 0.5 liter per 600 miles (1,000 km), consult a NISSAN dealer
CAUTION
Oil level should be checked regularly. Operating the engine with an insufficient amount of oil can damage the engine, and such damage is not covered by warranty.
Changing engine oil

1. Park the vehicle on a level surface and apply the parking brake.
2. Start the engine and let it idle until it reaches operating temperature, then turn it off.
3. Remove the oil filler cap A by turning it counterclockwise.
4. Place a large drain pan under the drain plug B .
5. Remove the drain plug B with a wrench by turning it counterclockwise and completely drain the oil.
If the oil filter is to be changed, remove and replace it at this time. For additional information, refer to "Changing engine oil filter" in this section.
WARNING
- Prolonged and repeated contact with used engine oil may cause skin cancer.
- Try to avoid direct skin contact with used oil. If skin contact is made, wash thoroughly with soap or hand cleaner as soon as possible.
- Keep used engine oil out of reach of children.
CAUTION
- Be careful not to burn yourself. The engine oil may be hot.
- Waste oil must be disposed of properly.
- Check your local regulations.
6. Clean and reinstall the drain plug B and a new washer. Securely tighten the drain plug B with a wrench. Do not use excessive force.
Drain plug tightening torque: 25 ft-lb (34 N*m)
7. Refill engine with recommended oil through the oil filler opening, then install the oil filler cap A securely.
For additional information on drain and refill capacity, refer to "Recommended fluids/lubricants and capacities" in the "Technical and consumer information" section of this manual.
The drain and refill capacity depends on the oil temperature and drain time. Use these specifications for reference only. Always use the dipstick to determine when the proper amount of oil is in the engine.
8. Start the engine. Check for leakage around the drain plug B and oil filter. Correct as required.
9. Turn the engine off and wait more than 10 minutes. Check the oil level with the dipstick. Add engine oil if necessary.
Changing engine oil filter

1. Park the vehicle on a level surface and apply the parking brake.
2. Turn the engine off.
3. Place a large drain pan under the oil filter B .
4. Loosen the oil filter with an oil filter wrench by turning it counterclockwise. Then remove the oil filter by turning it by hand.
CAUTION
Be careful not to burn yourself. The engine oil may be hot.
5. Wipe the engine oil filter sealing surface with a clean rag.
CAUTION
Be sure to remove any old gasket material remaining on the sealing surface of the engine. Failure to do so could lead to engine damage.
6. Coat the gasket on the new filter with clean engine oil .
7. Screw on the oil filter until a slight resistance is felt, then tighten an additional 2/3 turn.
Oil filter tightening torque: 13 ft-lbs (18 N*m)
8. Start the engine and check for leakage around the oil filter. Correct as required.
9. Turn the engine off and wait more than 10 minutes. Check the oil level. Add engine oil by removing the oil filler cap A if necessary.
 Engine cooling system
The engine cooling system is filled at the factory with a pre-diluted mixture of 50% Genuine NISSAN Long Life Antifreeze/Coolant (blue) and 50% water to provide year-round antifreeze and coolant p ...
Continuously Variable Transmission (CVT) fluid (if so equipped)
CAUTION NISSAN recommends using Genuine NISSAN CVT Fluid NS-3 (or equivalent) ONLY in NISSAN CVTs. Do not mix with other fluids. Do not use Automatic transmission fluid (ATF) or Manual t ...
Other materials:
Parking brake
WARNING
Be sure the parking brake is fully released
before driving. Failure to do so
can cause brake failure and lead to an
accident.
Do not release the parking brake from
outside the vehicle.
Do not use the shift lever in place of the
parking brake. When parking, be sure
the par ...
Structure and operation
Sectional View
1. Clutch housing 2. 1st-2nd synchronizer hub assembly 3. 3rd-4th
synchronizer hub assembly
4. 5th input gear 5. 5th-reverse synchronizer hub assembly 6. 5th-reverse baulk
ring
7. 5th main gear 8. 4th main gear 9. 3rd main gear
10. 2nd main gear 11. 2nd double-cone synchr ...
Categories
- Manuals Home
- Nissan Versa Owners Manual
- Nissan Versa Service Manual
- Video Guides
- Questions & Answers
- External Resources
- Latest Updates
- Most Popular
- Sitemap
- Search the site
- Privacy Policy
- Contact Us

0.0261