Nissan Versa (N17): Brake fluid
Inspection
BRAKE FLUID LEVEL
- Check that the fluid level in the reservoir tank is within the specified range between the MAX - MIN lines as shown.
- Visually check for any brake fluid leakage around the reservoir tank.
- Check the brake system for any leakage if the fluid level is extremely low (lower than MIN).
- Check the brake system for fluid leakage if the warning lamp remains illuminated even after the parking brake is released.
- Check the reservoir tank for the mixing of foreign matter (e.g. dust) and oils other than brake fluid.

BRAKE LINE
- Check brake line (pipes and hoses) for cracks, deterioration or other damage. Replace any damaged parts.
- Check for brake fluid leaks by fully depressing brake pedal while engine is running.
CAUTION: Retighten the applicable connection to the specified torque and repair any abnormal (damaged, worn or deformed) part if any brake fluid leaks are present.

Draining
CAUTION:
- Do not spill or splash brake fluid on painted surfaces. Brake fluid may seriously damage paint. Wipe it off immediately and wash with water if it gets on a painted surface.
- Turn the ignition switch OFF and disconnect battery negative terminal before performing work.
- Connect a vinyl tube to the bleed valve.
- Depress the brake pedal and loosen the bleeder valve to gradually discharge brake fluid.
Refilling
CAUTION:
- Turn the ignition switch OFF and disconnect battery negative terminal before performing work.
- Do not spill or splash brake fluid on painted surfaces. Brake fluid may seriously damage paint. Wipe it off immediately and wash with water if it gets on a painted surface.

- Check that there is no foreign material in the reservoir tank, and refill with new brake fluid.
CAUTION:
- Do not reuse drained brake fluid.
- Do not allow foreign matter (e.g., dust) and oils other than brake fluid to enter the reservoir tank.
- Loosen the bleeder valve, slowly depress the brake pedal to the
full stroke, and then release the pedal. Repeat this operation at
intervals of 2 or 3 seconds until new brake fluid is discharged.
Then close the bleeder valve with the brake pedal depressed.
Repeat the same work on each wheel.
- Perform the air bleeding. Refer to BR "Bleeding Brake System".
Bleeding Brake System
CAUTION:
- Turn the ignition switch OFF and disconnect battery negative terminal before performing the work.
- Monitor the fluid level in the reservoir tank while performing the air bleeding
- Do not spill or splash brake fluid on painted surfaces. Brake fluid may seriously damage paint. Wipe it off immediately and wash with water if it gets on a painted surface.
- Always use new brake fluid for refilling. Do not reuse the drained brake fluid.
- Do not allow foreign matter (e.g. dust) and oils other than brake fluid to enter the reservoir tank.
- Connect a vinyl tube to the bleeder valve of the rear right brake.
- Fully depress the brake pedal 4 to 5 times.
- Loosen the bleeder valve and bleed air with the brake pedal depressed, and then quickly tighten the bleeder valve.
- Repeat steps 2 and 3 until all of the air is out of the brake line.
- Tighten the bleeder valve to the specified torque.
- Front disc brake: refer to BR "BRAKE CALIPER ASSEMBLY : Exploded View".
- Rear drum brake: refer to BR "Exploded View".
- Perform steps 1 to 5. Occasionally fill with the brake fluid in order to keep the reservoir tank at least half of MAX line. Bleed air in the following order: rear right brake → front left brake → rear left brake → and front right brake in order.
- Check that the fluid level in the reservoir tank is within the specified range after air bleeding. Refer to BR "Inspection".
- Check each item of brake pedal. Adjust it if the measurement value is not the standard. Refer to BR"Inspection and Adjustment".
BRAKE MASTER CYLINDER
Inspection
FLUID LEAK
Check for brake fluid leakage from the master cylinder mounting face, reservoir tank mounting face and brake pipe connections.
BRAKE BOOSTER
Inspection
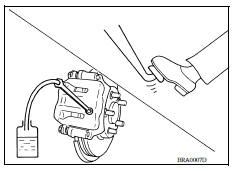
OPERATION
Depress the brake pedal several times at 5-second intervals with the engine stopped. Start the engine with the brake pedal fully depressed. Check that the clearance between brake pedal and dash lower panel decreases.
NOTE: A slight impact with a small click may be felt on the pedal when the brake pedal is fully depressed. This is a normal phenomenon due to the brake system operation.
AIR TIGHT
- Run the engine at idle for 1 minute to apply vacuum to the brake booster, and stop the engine. Then depress the brake pedal several times at 5-second intervals until the accumulated vacuum is released to atmospheric pressure. Check that the clearance between brake pedal and dash lower panel gradually increases each time the brake pedal is depressed when performing this operation.
- Depress the brake pedal with the engine running. Then stop the engine while holding down the brake pedal. Check that the brake pedal stroke does not change after holding down the brake pedal for 30 seconds or more.
FRONT DISC BRAKE
 Brake pedal
Inspection and Adjustment INSPECTION Brake Pedal Height Check the height (H1) between the dash lower panel (1) and the brake pedal upper surface. (H1) : Refer to BR "Brake Pedal". ...
Brake pad
BRAKE PAD : Inspection and Adjustment INSPECTION Check brake pad wear thickness from an inspection hole on cylinder body. Check using a scale if necessary. Wear thickness : Refer to BR "F ...
Other materials:
Description
Engine Cooling System
M/T models
CVT and A/T models
Engine Cooling System Schematic
M/T models
CVT and A/T models
OVERHEATING CAUSE ANALYSIS
Troubleshooting Chart
Symptom
Check items
Cooling system
parts
malfunction
Poor heat transfer
...
Precautions
Precaution for Supplemental Restraint System
(SRS) "AIR BAG" and "SEAT BELT PRE-TENSIONER"
The Supplemental Restraint System such as "AIR BAG" and "SEAT BELT PRE-TENSIONER",
used along
with a front seat belt, helps to reduce the risk or severity of injury to the
driver and ...
Categories
- Manuals Home
- Nissan Versa Owners Manual
- Nissan Versa Service Manual
- Video Guides
- Questions & Answers
- External Resources
- Latest Updates
- Most Popular
- Sitemap
- Search the site
- Privacy Policy
- Contact Us

0.0065