Nissan Versa (N17): Meters and gauges

Type A (if so equipped)
1. Tachometer
2. Speedometer
3. Fuel gauge
4. Odometer Twin trip odometer Trip computer
5. Continuously Variable Transmission (CVT) position indicator (if so equipped) Automatic Transmission (A/T) position indicator (if so equipped)
6. Instrument brightness control knob
7. Change/reset button
CAUTION
- To clean the meter lens, use a soft cloth, dampened with water. Never use a rough cloth, alcohol, benzine, thinner or any kind of solvent or paper towel with a chemical cleaning agent. They will scratch or cause discoloration to the lens.
- Do not spray any liquid such as water on the meter lens. Spraying liquid may cause the systems to malfunction.

Type B (if so equipped)
1. Tachometer
2. Temperature gauge
3. Odometer Twin trip odometer Trip computer. Outside air temperature (if so equipped)
4. Fuel gauge
5. Speedometer
6. Change/reset button
7. Continuously Variable Transmission (CVT) position indicator
8. Instrument brightness control
CAUTION
- To clean the meter lens, use a soft cloth, dampened with water. Never use a rough cloth, alcohol, benzine, thinner or any kind of solvent or paper towel with a chemical cleaning agent. They will scratch or cause discoloration to the lens.
- Do not spray any liquid such as water on the meter lens. Spraying liquid may cause the systems to malfunction.
Speedometer and odometer
This vehicle is equipped with a speedometer and odometer. The speedometer is located on the right side or in the center of the meter cluster. The odometer is located within the trip computer.
Type A (if so equipped)
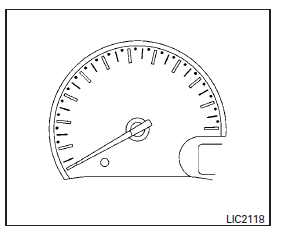
Speedometer
The speedometer indicates vehicle speed.
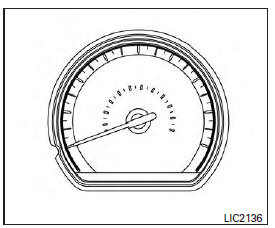
Type B (if so equipped)

Type A (if so equipped)
Odometer/Twin trip odometer
The odometer/twin trip odometer is displayed when the ignition switch is placed in the ON position.
The odometer 1 records the total distance the vehicle has been driven.
The twin trip odometer 2 records the distance of individual trips.

Type B (if so equipped)
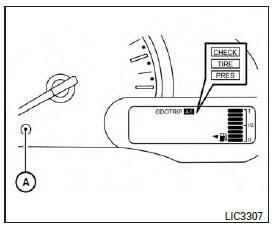
Changing the display
Press the change/reset button 3 to change the display as follows: Odometer (ODO) → Trip A → Trip B → Instant fuel consumption → Average fuel consumption → DTE (cruising range) → Odometer (ODO)
Resetting the trip odometer
Pushing the TRIP RESET switch 3 for more than 1 second resets the currently displayed trip odometer to zero.
Average fuel economy and distance to empty information is also available. For additional information, refer to "Trip computer" in this section.

Type A (if so equipped)
Loose fuel cap warning message
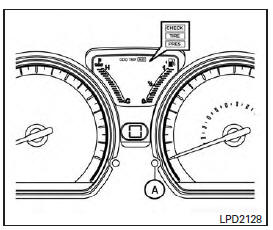
Push the reset button A for more than 1 second to reset the LOOSE FUEL CAP warning message after the fuel cap has been tightened. For additional information, refer to "Fuel-filler cap" in the "Pre-driving checks and adjustments" section of this manual.

Type B (if so equipped)
Type A (if so equipped)
Check tire pressure warning message (if so equipped)
The CHECK TIRE PRES warning message is displayed when the low tire pressure warning light is illuminated and low tire pressure is detected.
Check and adjust the tire pressure to the recommended COLD tire pressure shown on the Tire and Loading Information label. The CHECK TIRE PRES warning message can be turned off using the reset button A on the meter, the low tire pressure warning light will not be turned off.
Type B (if so equipped)
The low tire pressure warning light remains illuminated until the tires are inflated to the recommended COLD tire pressure. The CHECK TIRE PRES warning message is displayed each time the ignition switch is placed in the ON position as long as the low tire pressure warning light remains illuminated. For additional information, refer to "Low tire pressure warning light" in this section, "Tire Pressure Monitoring System (TPMS)" in the "Starting and driving" section, and "Wheels and tires" in the "Do-it-yourself" section of this manual.
Tachometer

Type A (if so equipped)
The tachometer indicates engine speed in revolutions per minute (rpm).
Do not rev the engine into the red zone 1 .
CAUTION
When engine speed approaches the red zone, shift to a higher gear or reduce engine speed. Operating the engine in the red zone may cause serious engine damage.

Type B (if so equipped)

Type B (if so equipped)
Engine coolant temperature gauge (if so equipped)
Type A (if so equipped)
Engine coolant temperature monitoring is performed by the high temperature warning light. For additional information, refer to "High temperature warning light" in this section.
Type B (if so equipped)
NOTE:
The ignition switch must be placed in the ON position for the gauge to give a reading.
The ignition switch must be placed in the ON position for the gauge to give a reading.
CAUTION
If the gauge indicates a coolant temperature near the hot (H) end of the normal range, reduce vehicle speed to decrease the temperature. If the gauge is over the normal range, stop the vehicle as soon as safely possible. If the engine is overheated, continued operation of the vehicle may seriously damage the engine. For additional information, refer to "If your vehicle overheats" in the "In case of emergency" section of this manual for immediate action required.
Fuel gauge

Type A (if so equipped)
The gauge indicates the approximate fuel level in the tank when the ignition switch is placed in the ON position.
The gauge may move slightly during braking, turning, acceleration, or going up or down hills.
Type A (if so equipped): The fuel level segments A will blink when the amount of fuel in the tank is getting low.
Type B (if so equipped): The low fuel warning light A will turn on when the amount of fuel in the tank is getting low.

Type B (if so equipped)
Refill the fuel tank before the gauge registers 0 (Empty).
The  indicates that the
fuel-filler door is
located on the driver's side of the vehicle.
indicates that the
fuel-filler door is
located on the driver's side of the vehicle.
CAUTION
- If the vehicle runs out of fuel, the
 check engine light may come on. Refuel
as soon as possible. After a few driving
trips, the
check engine light may come on. Refuel
as soon as possible. After a few driving
trips, the  light should
turn off. If
the light remains on after a few driving
trips, have the vehicle inspected. It is
recommended that you visit a NISSAN
dealer for this service.
light should
turn off. If
the light remains on after a few driving
trips, have the vehicle inspected. It is
recommended that you visit a NISSAN
dealer for this service. - For additional information, refer to "Malfunction Indicator Light (MIL)" in this section.
Trip computer

Type A (if so equipped)
When the ignition switch is placed in the ON position, modes of the trip computer can be selected by pushing the change/reset button A on the instrument panel located near the speedometer.
The following modes can be selected in the display B :
- Odometer
- Trip A
- Trip B
- Instant fuel consumption
- Average fuel consumption

Type B (if so equipped)
- Distance to empty
- Outside air temperature (if so equipped)
Odometer
The odometer records the total distance the vehicle has been driven.
Trip A
Measures the distance of one specific trip.
Trip B
Measures the distance of a second specific trip.
Instant fuel consumption
The instant fuel consumption mode shows the instant fuel economy. The display updates instantly when driving.
Average fuel consumption (mpg or l (liter)/100 km)
The average fuel consumption mode shows the average fuel consumption since the last reset.
Resetting is done by pressing the trip or change button for more than approximately 1 second.
The display is updated every 30 seconds. At about the first 1/3 mi (500 m) after a reset, the display shows (----).
Distance to empty
The distance to empty mode provides you with an estimation of the distance that can be driven before refueling. The range is constantly being calculated, based on the amount of fuel in the fuel tank and the actual fuel consumption.
The distance to empty includes a low range warning feature: when the fuel level is low, the distance to empty is automatically selected and the digits blink in order to draw the driver's attention.
Press the trip computer change/reset button A if you wish to return to the mode that was selected before the warning occurred.
When the fuel level drops even lower, the distance to empty will display (----).
Outside air temperature (F or C) (if so equipped)
The outside air temperature is displayed in F or C.
The ambient temperature sensor is located in front of the radiator. The sensor may be affected by road or engine heat, wind directions and other driving conditions. The display may differ from the actual ambient temperature or the temperature displayed on various signs or billboards.
Trip computer reset
Pressing the change/reset button for more than 3 seconds will reset all modes except Trip A and distance to empty.
 Instrument panel
1. Headlight/turn signal switch/fog light switch (if so equipped) 2. Driver's supplemental air bag (P. 1-39) Horn 3. Meters and gauges. Warning and indicator lights 4. Wiper and washer switch ...

Other materials:
Power outlets
Instrument panel
Console (if so equipped)
The power outlets are for powering electrical
accessories such as cellular telephones. The
outlets are rated at 12 volt, 120W (10A) maximum.
CAUTION
The outlet and plug may be hot during
or immediately after use.
Only certain power outlets ...
Clutch piping
Exploded View
1. CSC (Concentric Slave Cylinder) 2. Clutch tube 3. Clutch damper
4. Bracket 5. Master cylinder
Hydraulic Layout
1. Clutch tube 2. Lock pin 3. CSC (concentric slave cylinder)
4. Clutch damper 5. Master cylinder 6. Clutch pedal
Removal and Installation
CAUTION:
Do not ...
Categories
- Manuals Home
- Nissan Versa Owners Manual
- Nissan Versa Service Manual
- Video Guides
- Questions & Answers
- External Resources
- Latest Updates
- Most Popular
- Sitemap
- Search the site
- Privacy Policy
- Contact Us

0.0072