Nissan Versa (N17): Audio unit
Removal and Installation
REMOVAL
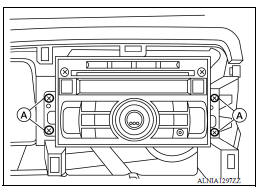
1. Remove cluster lid C. Refer to IP "Removal and Installation".
2. Remove the audio unit screws (A).
3. Pull the audio unit out.
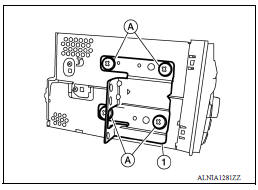
4. Disconnect the harness connectors from the audio unit and remove.
5. Remove the audio unit bracket screws (A) and the audio unit bracket (1) from each side of the audio unit (if necessary).
INSTALLATION
Installation is in the reverse order of removal.
 Normal operating condition
Description RELATED TO NOISE The majority of the audio concerns are the result of outside causes (bad CD, electromagnetic interference, etc.). The following noise results from variations in ...
Front door speaker
Removal and Installation REMOVAL 1. Remove the front door finisher. Refer to INT "Removal and Installation". 2. Remove the front door speaker screws (A). 3. Disconnect the harness conn ...
Other materials:
Break-in schedule
CAUTION
During the first 1,200 miles (2,000 km),
follow these recommendations to obtain
maximum engine performance and ensure
the future reliability and economy of your
new vehicle. Failure to follow these recommendations
may result in shortened
engine life and reduced engine
performance.
...
Spark plug
Exploded View
1. Ignition coil 2. Spark plug
Removal and Installation
REMOVAL
1. Remove ignition coil.
CAUTION:
Do not drop or shock ignition coil.
2. Remove spark plug using a suitable tool.
Diameter (a) : 14 mm (0.55 in)
CAUTION:
Do not drop or shock spark plug.
INSPECTION AFTER REM ...
Categories
- Manuals Home
- Nissan Versa Owners Manual
- Nissan Versa Service Manual
- Video Guides
- Questions & Answers
- External Resources
- Latest Updates
- Most Popular
- Sitemap
- Search the site
- Privacy Policy
- Contact Us

0.0069